My cats have been very busy the past few weeks playing with items that should not be played with such as my cell phone charger (which they have managed to unplug and bat around until it got lost in some yet to be discovered hiding place), extra zippers for my sewing projects, my youngest son's Lego pieces that he left lying around along with random Trash Packs, Shopkins, and Grossery Gang toys. The cats especially love the rubbery bouncy toys which they can chase around randomly.
They have totally abandoned their store bought catnip filled mice in favor of chasing pens and pencils that they bat to the floor and swat around until the items get lost under the forgotten realm of "The Space Under The Fridge". It's not enough for them to chase each other throughout our three bedroom house, sometimes they chase me as well.
So, after they tore off the dangling mouse from its elastic strap which was attached to their expansive catwalk shelves, I decided they needed a new distraction in the form of a catnip filled fish shaped toy.
As usual, I scoured the internet for hours searching for "the perfect" fish pattern....ok, maybe it was just an hour. A few screenshots later, I tested my hand at drawing the exact pattern I wanted and this is what I came up with:
My daughter said it looked like a mermaid's tail, my husband said it was a vase, my young little Nicky was the only one who stated it looked like a "fishie". Way to go, Son!! I thought it looked kind of like the Goldfish crackers.
After trimming down the stomach a bit, and adding a larger tail, it started to take the shape of a very noticable fish and was no longer a vase:
As you can see from the photos, my fish was revamped into a larger fish and now sported a dorsal fin as well as a luxurious tail.
First, I started off by drawing and cutting out my pattern. Then, I taped the whole pattern with clear packaging tape to make it a bit sturdier during the process of tracing the shape on my fabric.
I then measured a width of 5 1/2" x 10 1/2" for both the outside fabric and the interfacing.Here, you can fold or cut the fabric in half and pin your fish template in place as shown in the next picture.
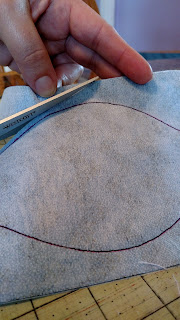
You can see that I did not cut the shape I just drew. The drawn part is your stitch line. At this point, decide on where you want the opening to be, and sew around the rest of the pattern
I chose to have the opening at the mouth, which leaves just enough space to fit around a baking funnel; however, you might want to leave a larger opening at the stomach where you can sew velcro to be able to freshen up the catnip.
Once your pattern s sewn, cut off the extra material, but leave enough fabric to cut small slits all around the curves.
I pinned a few of the curves to ensure that I would not cut through the stitches. the pins will stop the scissors.
After cutting the curves, turn your fish right side outpart of the way and start filling the tail with small bits of polyfil. this part can be a bit tricky. I filled one side of the tail first and then worked on the other side before filling the middle of the tail and working my way up a bit. When I got to the part right before the body, I pulled the fabric through and started poking the areas around the corners of the mouth.
At this point, insert the funnel and add just a pinch of catnip. Be sure to hold the mouth firmly around the funnel so it doesn't slip off or you will have catnip and crazy cats in your work area...yes, that happened to me. I also learned to have a spray bottle close by.
Alternate between adding polyfil and catnip. Every once in a while, I would mix it up by either shaking the fish, or just sticking a pencil, stick, or whatever in and pushing the polyfil around a bit so that the catnip was evenly placed.
Shay thought he was helping,...I had to spray him a couple of times in order to keep him from causing a mess with the bottle of catnip I had on hand.
Make your fish firm by pushing down the polyfil a bit, but dont make it so stuffed that you can see the seams. once you are done,close your opening by doing a tight and small ladder stitch with a good old fashioned needle and thread...or, velcro it shut and toss your finished product at your anxiously waiting furbaby and enjoy!!
Shay is finally able to enjoy his new toy. He hugs it, bites it, bats it, chases it, and scratches at it with his hind feet. It's quite entertaining to watch!


Comments
Post a Comment