A couple of days ago, as I was in the middle of an English lesson with my son (I homeschool my boys), he ran off to climb onto a chair in front of my desk in order to reach a small plastic organizer filled with erasers.
Usually, I have one or two on his desk, but he has developed this habit of tossing his eraser out of the way when he is finished using it. Sometimes, it lands a few inches away from him. Other times, it winds up under one of his schoolbooks, or on the floor just under his chair. However, the majority of the time, it seems to disappear in some random black hole that mysteriously opens up to suck the eraser into nothingness so it is never to be heard from again until next spring cleaning when it magically appears in some ridiculously impossible hiding spot.
Fearful of his precarious perch to reach the organizer, I figured I would put my crafting skills...and my collection (hoard) of scrap fabric...to good use by making a storage solution for the many erasers we need in our arsenal within his reach.
First, the supplies. I like to save money any way I can which results in an over-abundance of sauce and dip jars at my disposal. In this project, I chose a plain Tostitos chip dip glass jar, scrap fabric, paintbrush, see through ruler, very sharp scissors or a rotary cutter, and Mod Podge (I would have made my own, but, I broke down a few weeks ago and bought a jar of over-priced Mod Podge for a totally different project and figured, "Hey, since I've got it, I might as well use it. Right?").
Step 1: Peel off the front and back stickers.
You don't need to bother with washing off the glue left over from the stickers. It helps to keep the fabric in place while you are wrapping it around the jar.
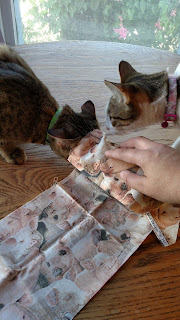
Now, your cats may want to inspect your work at this point since they are perfectionists and may even lend a paw where they think you are incompetent.
Wrap your fabric to determine how much you need to go around the jar. Allow an extra inch...just to ensure the jar is completely covered. I cut mine with barely a millimeter to spare and had a tough time in one small section that refused to stay covered.
If you use the Tostitos dip jar, you can cut your fabric square in a 7" x 11" rectangle. That will give you enough fabric to cover the bottom of your jar completely and wrap inside the opening of the jar.
As I stated earlier, the sticker glue will help you when you wrap your fabric around the jar. Make sure you center it so the bottom fabric covers completely when folded in...just like wrapping a cylinder shaped Christmas gift.
I sealed the seam with a bit of Mod Podge and let it dry for a few minutes before proceeding.
Starting with the bottom of the jar, I cut the fabric straight down to just a bit beyond the curve of the jar and estimated where the next cut should be. The way I figured this was by slightly folding the fabric in close to the bottom to determine where the natural wrinkle would be which is roughly half an inch from your first cut. If you use a smaller jar, you might have to go to a quarter inch. A larger jar, about three quarters of an inch.
Instead of cutting all the way around, I would cut and then apply the Mod Podge and flatten it down toward the center.
Keep going around using this technique and you won't have any wrinkles.
VOILA!! Your jar will look like this.
Apply Mod Podge along all of the seams on the side and the bottom and allow to dry.
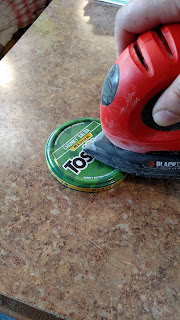
The next step involves the lid. You may choose to decorate it with the same fabric; however, I decided to sand mine down using my handy electric mouse sander.
Look at that nice rustic design! I left a trim of the original green paint just for a bit of an accent (honestly, because I had a hard enough time trying to sand off the paint from the top grooves and did not want to have to deal with the awkward part of the lid). I personally like the way the lid looks with the green outline.
Once you've finished the lid, your jar should be dry enough for the next step. Again, using the same technique, cut, glue, and fold the fabric around the top, but, ONLY CUT TO THE TOP OF THE JAR.
Don't try to glue the fabric into all of the twist on grooves. Once your jar is completely finished, the lid will twist on easily enough without you struggling with the fabric.
I also applied a layer of Mod Podge all over the fabric for a complete seal and let it dry before replacing the lid.
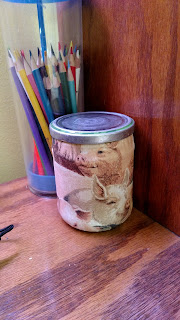
And there you have it. A simple, yet, stylish accent jar for your desk. You may want to add a few accents such as a decorative knob on top, or ribbon going around the lid.
This was for my son who loves pigs, so, I kept it simple with no frills. I might add one of his plastic toy pigs on top of the lid later on once I get him to pick one out. Or I might surprise him with a new pig figurine he doesn't have.
Also, no cats were harmed during this process. ☺


Comments
Post a Comment